Auto-Fill Forms (DOC, Excel, PDF)
Automate filling out repetitive forms using structured data from your documents. No manual copy-paste, no typos, no hours of tedious data entry.
Quick Navigation
- Overview - Problem, solution, and what you'll achieve
- Step-by-Step Setup — How to set up
- Instruction Example - Copy-paste prompts for 3 types of forms
- Review & Refine — Verify and correct output
- How to Improve Results — Tips and best practices
- Troubleshooting — Common issues and solutions
Overview
Problem It Solves
Filling out forms manually is slow and error-prone:
- Manual copy-paste from source documents to form fields
- Typos and data entry errors from repetitive work
- Inconsistent formatting across different forms
Common Pain Point
Manually filling out forms can take 30+ minutes per document, particularly when you’re constantly switching between sources and verifying details.
Why This Is Different with FabriXWork
Traditional Manual Form Filling:
Open source doc → Copy data → Open form → Paste → Format → Repeat for each field
                     ↑                                                    │
                     └────────────── Typos? Start over ─────────────────┘
With FabriXWork:
FabriXWork agent reads your source documents and fills the entire form automatically. Same data, proper format, zero copying.
Your Documents → Agent → "Fill the form" → Done
      ↑              │
      └── Update source, regenerate ──┘
Key Advantage
Your data stays accurate. No copying, no typos, no format issues. Update the source, regenerate in seconds.
What You Will Achieve
By following this guide, you will be able to:
✅ Automatically populate DOC, Excel, and PDF forms with your data
✅ Reduce data entry time by 80%+
✅ Eliminate manual copy-paste errors
✅ Standardize form outputs
Time to complete: 5-10 minutes per form (vs. 30+ minutes manually)
Output: Completed form ready for review and submission
Complexity Level: 🟢 Beginner
Form Types Demonstrated in This Guide
This guide demonstrates 3 common form types with ready-to-use prompts.
| Type | Example Use Case | Time Saved |
|---|---|---|
| DOC | Bidding applications, contracts | 25 min → 5 min |
| Excel | Expense reports, financial templates | 20 min → 3 min |
| PDF (fillable only) | Registration forms, applications | 15 min → 3 min |
Step-by-Step Setup
Step 1: Prepare Your Documents
Before starting, gather:
- Source documents: Documents used to extract information for form completion, such as annual reports, financial statements, and company profiles.
- Reference data: Project codes, product catalogs, etc.
- Form template: The DOC, Excel, or fillable PDF form to fill
- Supporting documents: Certifications, licenses, etc.
Step 2: Choose Your Agent
You can use any AI agent in FabriXWork to fill forms.
- If you already have an agent: Use the agent you're currently working with (they already know your context and content)
- If you need a new agent: For business forms, Alex - Business Analyst is recommended for data extraction expertise
- If you haven't added any agent yet: Follow the Add Your First Agent guide first
Step 3: Connect Your Folder
Skip This Step If...
You're already working with an agent and your files are in the connected folder. Only follow this step if you're adding a new agent or need to connect a different folder.
If you are adding a new agent:
Follow Connect to Local Folder to connect your agent to a local folder.
If you want to connect a different folder:
- Select your agent from the sidebar
- In the right panel, click "Change" to connect a folder

- Add your files into that folder
Step 4: Give Your Instruction
To fill your form, use one of the instruction examples in the next section as your starting point. Choose the example that best matches your form type, then replace the sample file names and details with your own.
How to Use These Templates
The prompts below are templates, replace the [PLACEHOLDER] text with your specific details:
[FORM NAME]→ Your actual form name[SOURCE-DOC.md]→ Your source document filenames[FIELD1, FIELD2]→ Your actual form fields- Adjust sections/fields to match your form structure
Recommended Workflow: Plan First, Then Build
For complex forms, use a two-step approach for best results:
Step 1 - Plan Mode: Ask your agent to analyze your content and propose a structure before filling. This helps validate that the agent understands your form requirements, identifies missing data early, and allows you to adjust the approach before the form is filled.
Step 2 - Build Mode: Once you approve the plan, ask your agent to fill the form following the approved structure. This reduces revisions and ensures better accuracy since the agent has time to think through the data mapping.
How to Switch Modes:
Click the mode selector dropdown under the input box and choose between Plan or Build:
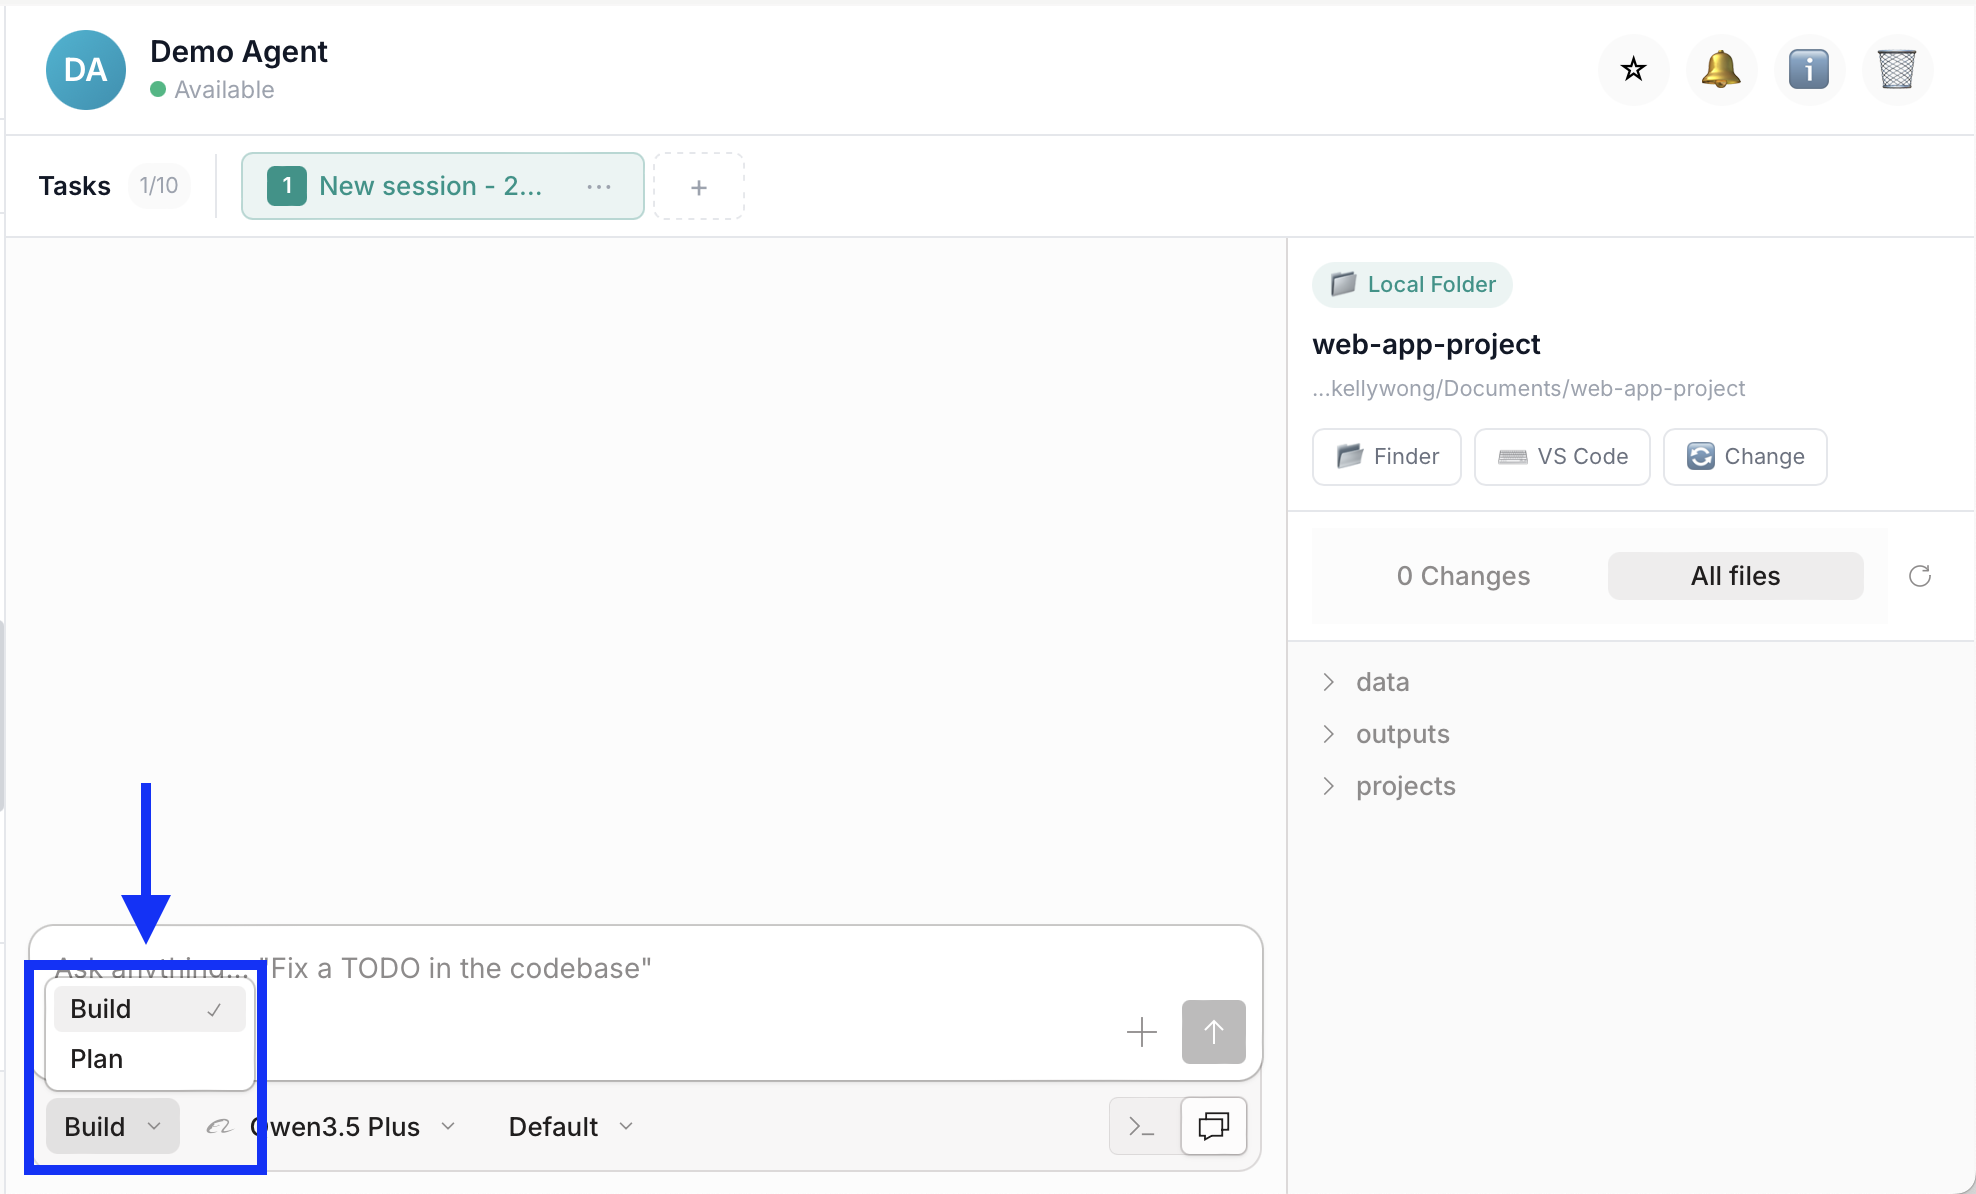
Start in Plan mode to review the proposed structure, then switch to Build mode to fill the form.
Why this workflow is more effective: Catches issues early (easier to adjust a plan than refill a form), aligns expectations, reduces revisions, and results in better quality output.
Instruction Examples
Example 1: DOC Form - Bidding Application
When to Use This Type
Use for: Contracts, proposals, bidding applications, reports, any structured DOC template
Background: You need to complete an RFP bidding form using information from your existing company documents.
Files Ready in Your Folder:
[SOURCE-DOC-1.doc]— [Description of data to extract, e.g., company info][SOURCE-DOC-2.xlsx]— [Description of data to extract, e.g., financial data][FORM-TEMPLATE.doc]— DOC template to fill
Your Prompt:
💡 Pro Tip: Use Plan Mode first (see workflow above) to review the proposed structure before building.
Fill out the [FORM NAME] using data from my connected folder.

Source documents:
- [SOURCE-DOC-1.doc] — (What information should be extracted)
- [SOURCE-DOC-2.xlsx] — (What information should be extracted)

Form Sections to Complete:
1. [SECTION NAME] — (field1, field2, field3)
2. [SECTION NAME] — (field1, field2, ...)
(Add or remove sections to match your form)

Instructions:
- Extract data from source documents
- Mark missing data as [NEEDS MANUAL ENTRY]
- Keep the original form structure and formatting unchanged
- Save as "[OUTPUT-FILENAME]-v1.doc"

Tone: [Professional/Formal - choose based on your audience]
Expected Output:
Form completed with data extracted from source documents. Fields with unavailable data marked as [NEEDS MANUAL ENTRY].
Customization Tips
For the bidding application example:
[FORM NAME]→ "Infrastructure-Bidding-2026.doc"[SOURCE-DOC-1]→ "annual-report-2025.doc" (company info, project history)[SOURCE-DOC-2]→ "financial-statements.xlsx" (assets, net worth, ratios)[SECTION 1]→ "Company Information (name, established, employees, turnover)"[SECTION 2]→ "Financial Capacity (assets, net worth, current ratio)"
DOC Form Tips
✅ Do: Use styles and consistent formatting, include section headers
❌ Don't: Skip formatting instructions, use vague field names
Example 2: Excel Form - Expense Report
When to Use This Type
Use for: Expense reports, financial templates, budget forms, data migration to structured spreadsheets
Background: You need to fill in your company’s expense report template using structured expense data already prepared by your agent.
Files Ready in Your Folder:
[SOURCE-DATA.md]— [Description of data to extract, e.g., receipt details][TEMPLATE-NAME.xlsx]— Excel template ([IMPORTANT: any special instructions])[REFERENCE-FILE.xlsx]— [Reference data, codes, mappings, etc.]
Your Prompt:
💡 Pro Tip: Use Plan Mode first (see workflow above) to review the proposed structure before building.
Fill out the [TEMPLATE NAME] using data from my connected folder.

Source Documents:
- [SOURCE-DATA.md] — [Brief description of what data to extract]
- [TEMPLATE-NAME.xlsx] — Excel template ([IMPORTANT: e.g., DO NOT modify formulas])
- [REFERENCE-FILE.xlsx] — [Reference data for mapping]

Excel Template Structure:
- Sheet [X]: [SHEET NAME] ([key columns/fields])
- Sheet [Y]: [SHEET NAME] ([key columns/fields])
(Add/remove sheets to match your template)

Instructions:
- Map each [item] to correct [category/field]
- [DO NOT modify / Preserve] [formulas/formatting/specific sheets]
- Flag [missing/uncertain data] as [CODE NEEDED / NEEDS REVIEW]
- Save as "[OUTPUT-FILENAME]-v1.xlsx"

Tone: [Professional/Precise - choose based on your needs]
Expected Output:
Excel template populated with data from source documents. Special instructions (e.g., formula preservation) followed. Items requiring review flagged accordingly.
Customization Tips
For the monthly expense report example:
[TEMPLATE NAME]→ "Expense-Report-Template.xlsx"[SOURCE-DATA]→ "receipts-extracted-data.md" (date, vendor, amount, category)[REFERENCE-FILE]→ "project-codes.xlsx" (budget code mapping)[SHEET 1]→ "Summary (auto-calculated totals)"[SHEET 2]→ "Line Items (date, vendor, category, amount, project code)"
Excel Form Tips
✅ Do: Protect formula cells, use clear column headers, provide reference sheets
❌ Don't: Forget to mention formulas, skip column structure details
Example 3: PDF Form - Vendor Registration
When to Use This Type
Use for: Vendor registrations, government applications, compliance forms, any fillable PDF
Important: Fillable PDF Only
This example works only with fillable PDF forms (PDFs with interactive form fields). For non-fillable PDFs, convert to DOC first or use PDF editing software.
Background: You need to complete a vendor registration PDF form using company information from your existing documents.
Files Ready in Your Folder:
[SOURCE-DOC-1.doc]— [Description of data to extract, e.g., company info][SOURCE-DOC-2.pdf]— [Description of data to extract, e.g., certificates][PDF-FORM-NAME.pdf]— Fillable PDF template
Your Prompt:
💡 Pro Tip: Use Plan Mode first (see workflow above) to review the proposed structure before building.
Fill out the [PDF-FORM-NAME] using data from my connected folder.

Source Documents:
- [SOURCE-DOC-1.doc] — [Brief description of what data to extract]
- [SOURCE-DOC-2.pdf] — [Brief description of what data to extract]

PDF Form Fields to Complete:
1. [FIELD GROUP 1] ([field1], [field2], [field3])
2. [FIELD GROUP 2] ([field1], [field2], ...)
(Add/remove to match your PDF form structure)

Instructions:
- Extract data from source documents
- Use [exact/precise] [data type] from [source document]
- Mark fields as [NEEDS MANUAL ENTRY] if data not found
- Save as "[OUTPUT-FILENAME]-v1.pdf"

Tone: [Formal/Professional - choose based on your audience]
Expected Output:
PDF form completed with data extracted from source documents. Fields with unavailable data marked as [NEEDS MANUAL ENTRY].
Customization Tips
For the vendor registration form example:
[PDF-FORM-NAME]→ "Vendor-Registration-Form.pdf"[SOURCE-DOC-1]→ "company-profile.doc" (company info, history, capabilities)[SOURCE-DOC-2]→ "business-certificates.pdf" (license numbers, tax IDs)[FIELD GROUP 1]→ "Company Details (name, address, registration number)"[FIELD GROUP 2]→ "Tax Information (tax ID, VAT number)"
PDF Form Tips
✅ Do: Test PDF is fillable first, provide exact field names
❌ Don't: Use non-fillable PDFs, assume field names are obvious
How to Check if PDF is Fillable:
- Open PDF in Adobe Reader or browser
- Try clicking on form fields
- If fields highlight and allow typing → Fillable ✓
- If nothing happens → Not fillable (needs conversion)
Review & Refine
Important: Always Review AI-Generated Output
AI agents are powerful assistants, but human review is essential. Always verify the generated output before using, sharing, or submitting it.
What to Check
After your agent generates the output, review for:
- Accuracy — Verify data, figures, and facts match your source documents
- Completeness — Ensure all required fields or sections are completed
- Formatting — Check that the structure and styling meet your requirements
How to Request Corrections
If you find issues, continue the conversation with your agent:
For form fields:
"Field [X] shows [incorrect value]. Please extract the correct data from [source document] and update the form."
For missing content:
"Section [X] is incomplete. Please extract [specific information] from [source document] and add it."
For refinements:
"The tone is too [casual/technical]. Please adjust to be more [professional/concise]."
Best Practices
✅ Do: Review the entire output, spot-check critical data, ask for clarification
❌ Don't: Assume accuracy without verification, submit without human review
Remember
Your agent is a collaborative tool. The best results come from AI efficiency + human oversight.
How to Improve Results
Tip 1: Provide Field Mapping
✅ Good: "Map 'Annual Revenue' in annual report → 'Annual Turnover' in form"
❌ Vague: "Use data from my annual report"
Tip 2: Set Validation Rules
✅ Good: "Validate that all financial figures match across documents"
❌ Vague: "Make sure the data is correct"
Tip 3: Request Completion Report
✅ Good: "After filling the form, provide a summary of completed vs. manual entry fields"
❌ Vague: "Let me know when done"
Tip 4: Specify Missing Data Handling
✅ Good: "Mark any fields you can't fill as [NEEDS MANUAL ENTRY] with a note"
❌ Vague: "Fill in what you can"
Tip 5: Test with Sample Data First
✅ Good: "Fill out one section first so I can review before completing the entire form"
❌ Vague: "Fill out the whole form"
Tip 6: Use Templates as Starting Point
✅ Good: "Copy the template prompt, replace placeholders with my specific details"
❌ Avoid: "Use the example exactly as-is without customization"
Troubleshooting
General Issues
| Issue | Likely Cause | What to Try |
|---|---|---|
| Data not found | Source document not in folder | "Check if source document is in connected folder" |
| Wrong data extracted | No field mapping provided | "Map 'X' in source → 'Y' in form" |
| Numbers don't match | Multiple sources conflict | "Cross-verify figures across all documents" |
| Formatting broken | No formatting instruction | "Maintain original template formatting" |
Format-Specific Issues
| Issue | Format | What to Try |
|---|---|---|
| Can't fill form | PDF is not fillable - convert to DOC first | |
| Formulas broken | Excel | Explicitly state "DO NOT modify formula cells" |
| Fields missing | DOC | Provide complete field list with section headers |
| Data in wrong cells | Excel | Specify exact column names and structure |
| Text overflow | Request "truncate long text to fit field" |
Related Use Cases
- Create Presentation Slides from Your Documents — Transform documents into presentations
- Customer Insight & Strategy Recommendations — Analyze data, generate insights